source("adaStan.R")

model <- setModel(drift = "theta*(mu-x)", diffusion = "sigma", state.variable = "x", solve.variable = "x")
sampling <- setSampling(Initial = 0, Terminal = 3, n = 1000)
yuima <- setYuima(model = model, sampling = sampling)
simulation <- simulate(yuima, true.parameter = c(theta = 1, mu = 0, sigma = 0.5), xinit = rnorm(1))

fit <- adaStan(simulation, iter=2000, rstan=FALSE)A Blog Entry on Bayesian Computation by an Applied Mathematician
$$
$$
R の YUIMA パッケージに関する詳細は,次の記事も参照:
1 問題提起
1.1 はじめに
確率過程の統計推測を行うための R パッケージ yuima では多次元の SDE \[
dX_t=b_t^\theta(X_t)\,dt+\sigma_t^\phi(X_t)\,dW_t,\qquad X_0\in\mathbb{R}^d,
\] に対してパラメータ \(\theta\in\mathbb{R}^{d_\theta},\phi\in\mathbb{R}^{d_\phi}\) の推定を実行することができる(YUIMA の記事 も参照).
YUIMA におけるパラメータ \(\theta,\varphi\) の推定には,qmle() による擬似最尤推定量を用いることだけでなく,adaBayes() を通じて,一般化ベイズによる事後平均推定を実行することも可能である.
現状の adaBayes() 関数では,自前のランダムウォーク MH アルゴリズムや p-CN アルゴリズムを用いているが,HMC (Hamiltonian Monte Carlo) (Duane et al., 1987), (Neal, 1996) も利用可能なように拡張することを考えたい.
ここでは新たな関数 adaStan() を定義することを考える.
2 最終的なコード
adaStan.R を参照.
fit$summary()# A tibble: 4 × 10
variable mean median sd mad q5 q95 rhat ess_bulk
<chr> <dbl> <dbl> <dbl> <dbl> <dbl> <dbl> <dbl> <dbl>
1 lp__ 3049. 3049. 1.34 1.39 3047. 3051. 1.08 35.5
2 theta 0.503 0.342 0.590 0.538 -0.103 1.64 1.15 21.0
3 mu -6.60 -0.525 13.3 1.56 -35.8 3.89 1.39 9.57
4 sigma 0.528 0.529 0.0118 0.0128 0.508 0.544 1.09 30.0
# ℹ 1 more variable: ess_tail <dbl>mcmc_hist(fit$draws("theta"))`stat_bin()` using `bins = 30`. Pick better value with `binwidth`.
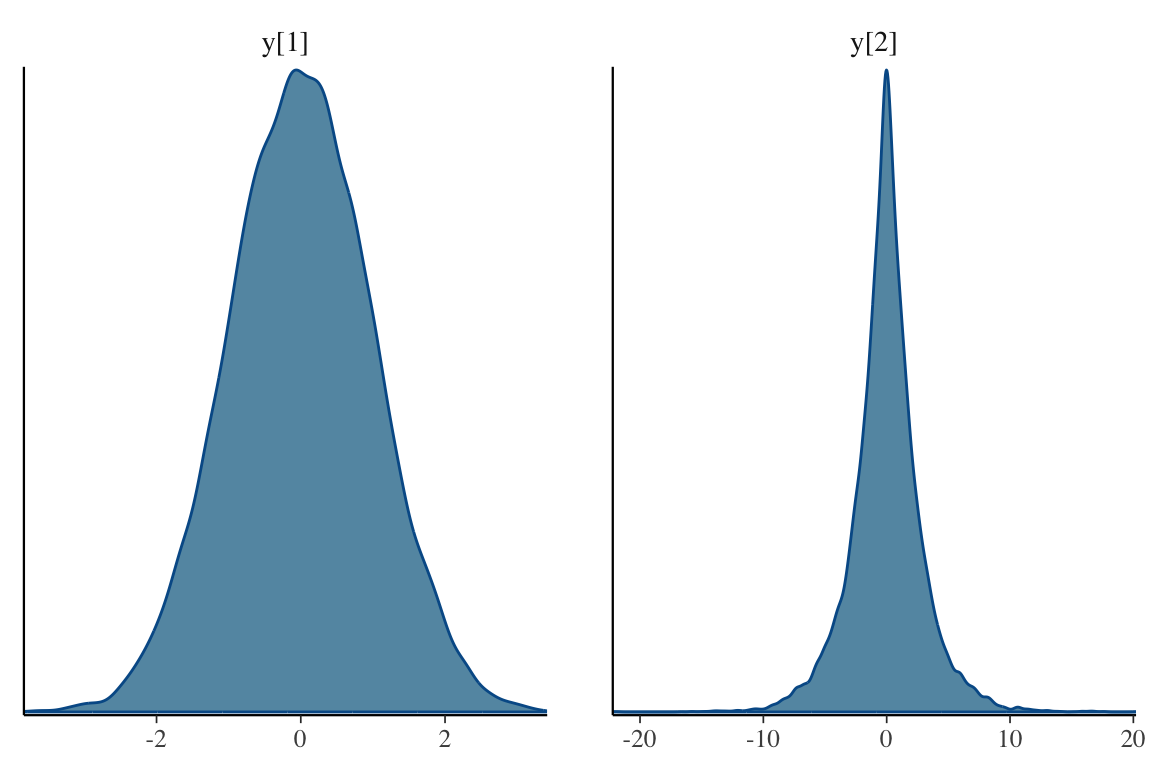
面白い!事後分布は2峰性をもっており,2000 回繰り返すと事後平均はかろうじて正解に近づいている.
3 背景
3.1 確率的プログラミング言語 Stan との連携
Stan は Hamiltonian Monte Carlo 法を用いた事後分布サンプリングを,確率モデルを定義するだけで実行することができる言語である.
加えて,バックグラウンドで C++ を用いているため,非常に高速な MCMC 計算が可能である.
確率的プログラミング言語 Stan については次の記事も参照:
RStan は確率的プログラミング言語 Stan とのインターフェイスを提供する R パッケージであり,これを用いることで R からでも Stan を通じた HMC を用いた事後分布からのサンプリングが実行できる.
ここでは YUIMA の adaBayes() 関数と同じ推定を,内部で Stan を用いて実行する関数 adaStan() の実装を試みる.
3.2 アイデアのスケッチ
具体的には,R において次のような関数を定義することになるだろう.
必ずしもベストな方法ではないかもしれないが,まずは RStan を用いてスケッチをしてみる.改良版は第 2 節参照.
library(yuima)
library(rstan)
yuima_to_stan <- function(yuima){
excode <- 'data {\n int N;\n vector[N+1] x;\n real T;\n real h;\n}
parameters {\n'
for(i in 1:length(yuima@model@parameter@all)){
excode <- paste(excode, " real", yuima@model@parameter@all[i], ";\n")
}
excode <- paste(excode,"\n}")
excode <- paste(excode,'\nmodel {\n x[1] ~ normal(0,1);\n for(n in 2:(N+1)){')
excode <- paste(excode,
"\n x[n] ~ normal(x[n-1] + h *", gsub("x", "x[n-1]", yuima@model@drift), ",sqrt(h) *", gsub("x", "x[n-1]", yuima@model@diffusion[[1]]),");\n }")
excode <- paste(excode,'\n}\n')
}
adaStan <- function(yuima){
excode <- yuima_to_stan(yuima)
sde_dat <- list(N = yuima@sampling@n,
x = as.numeric(yuima@data@original.data),
T=yuima@sampling@Terminal,
h=yuima@sampling@Terminal/yuima@sampling@n)
fit <- stan(model_code=excode,
data = sde_dat,
iter = 1000,
chains = 4)
return(fit)
}- 1
-
Stan モデルのコード(パラメータ部分は未定)を文字列として
excode変数に格納する. - 2
-
ここからが
adaStan関数の本体である.Yuima モデルの全てのパラメータについてループを開始して,excodeにパラメータの宣言を追加していく. - 3
- ここでついに Stan モデルのパラメータの定義部分が完成する.
- 4
-
最後はモデルの定義部分を追加して,Stan モデルのコードが完成する.最初の観測値
x[1]は \(\operatorname{N}(0,1)\) に従う. - 5
-
それ以降の観測値
x[n]は,前の観測値x[n-1]に drift 項と diffusion 項を加えたものに従う.これを実装するために,Yuima モデルの drift 項と diffusion 項の定義文を呼び出し,xをx[n-1]に置換することで Stan モデルのコードに埋め込む. - 6
-
adaStanという関数を定義する.この関数は,Yuima パッケージのオブジェクトを引数として受け取り,Stan での推定を行い,その結果をfitオブジェクトとして返す. - 7
-
Stan での推定を実行するために,Yuima モデルのデータを Stan モデルに渡すためのリスト
sde_datを作成する. - 8
-
最後に Stan モデルをコンパイルして実行し,結果を
fitオブジェクトとして返す.
yuima オブジェクトのスロットの存在のチェックや変数名 x の表記揺れなど,細かな問題も多いだろうが,本記事では殊に Stan との接続においてより良い方法を模索したい.
関数内部で Stan コードを文字列として生成していることがダサい.
より良いコードオブジェクトの取り扱い方や,Stan とのより安全で効率的なインターフェイスを模索したい.
Stan を使う以上,どこかで Stan モデルの情報を受け渡すことは必要になるが,できることならばもっと良い方法を考えたい.
3.3 サンプルコードの動き
adaStan() 関数の挙動を詳しく見るために,次の具体例を考える.
YUIMA を通じて1次元 OU 過程
\[ dX_t=\theta(\mu-X_t)\,dt+\sigma\,dW_t \]
をシミュレーションをするためには,次のようにモデル定義をする:
model <- setModel(drift = "theta*(mu-x)", diffusion = "sigma", state.variable = "x", solve.variable = "x")これだけで,YUIMA は勝手にパラメータを識別してくれる:
model@driftexpression((theta * (mu - x)))model@diffusion[[1]]expression((sigma))これを通じて生成される Stan モデル文は
data {
  int N;
  vector[N+1] x;
  real T;
  real h;
}

parameters {
  real theta;
  real mu;
  real sigma;
}

model {
  x[1] ~ normal(0,1);
  for(n in 2:(N+1)){
    x[n] ~ normal(x[n-1] + h * theta * (mu - x[n-1]),
                  sqrt(h) * sigma);
  }
}
となるべきであるが,実際その通りになる:
x <- setYuima(model = model)
stancode <- yuima_to_stan(x)
cat(stancode)
data {
int N;
vector[N+1] x;
real T;
real h;
}
parameters {
real theta ;
real mu ;
real sigma ;
}
model {
x[1] ~ normal(0,1);
for(n in 2:(N+1)){
x[n] ~ normal(x[n-1] + h * (theta * (mu - x[n-1])) ,sqrt(h) * (sigma) );
}
}3.4 CmdStanR による方法
同様のことが CmdStanR というパッケージを用いても実行可能である.
CmdStanR では一時ファイル上に stan ファイルを作成して,それをコンパイルして実行する.
library(cmdstanr)
stan_file_variables <- write_stan_file(stancode)
mod <- cmdstan_model(stan_file_variables)mod$print() # R6 オブジェクトなので $ を用いた method 呼び出しができるdata {
int N;
vector[N+1] x;
real T;
real h;
}
parameters {
real theta ;
real mu ;
real sigma ;
}
model {
x[1] ~ normal(0,1);
for(n in 2:(N+1)){
x[n] ~ normal(x[n-1] + h * (theta * (mu - x[n-1])) ,sqrt(h) * (sigma) );
}
}この方法ではバイナリファイルを作成・操作することができる.R セッションの終了とともに一時ファイルは削除される.
mod$stan_file()[1] "/var/folders/7c/j9mzb7pn0wn1k_f9j58c8y480000gn/T/RtmpFQDHJ2/model_28b66dedb9ecfce181f60d7f27d0c76d.stan"3.5 Stan コードのベクトル化
Stan モデルの問題であるが,なるべくベクトル記法を用いた方が,Stan コードの処理(特に自動微分の計算)が速くなる.
model {
  x[1] ~ normal(0, 1);  // 初期(値の事前)分布
  x[2:(N + 1)] ~ normal(x[1:N] + h * theta * (rep_vector(mu, N) - x[1:N]), sqrt(h) * sigma);  // xの2番目からN+1番目までをベクトル化して定義
}
3.6 一般化ベイズへの拡張
第 3.2 節のサンプルコードでは,ひとまず拡散過程のみにターゲットを絞って adaStan() を定義した.
ゆくゆくは遷移確率が極めて複雑になるような確率過程に対する推論も考える必要がある.
一方で Stan では target 変数を用いて明示的に対数密度を定義することができる.
target += normal_lpdf(y | mu, sigma);この明示的な記法を用いることで,擬似尤度などを用いた一般化ベイズ推定も実行できる.1
4 Stan インターフェイスの調査
4.1 我々のインターフェイス
前述の OU 過程 3.3
\[ dX_t=\theta(\mu-X_t)\,dt+\sigma\,dW_t \]
のモデル model に対して stan 関数でベイズ推定を実行してみる.パラメータは \[
\begin{pmatrix}\theta\\\mu\\\sigma\end{pmatrix}
=
\begin{pmatrix}1\\0\\0.5\end{pmatrix}
\] として YUIMA を用いてシミュレーションをし,そのデータを与えてパラメータが復元できるかをみる.
sampling <- setSampling(Initial = 0, Terminal = 3, n = 1000)
yuima <- setYuima(model = model, sampling = sampling)
simulation <- simulate(yuima, true.parameter = c(theta = 1, mu = 0, sigma = 0.5), xinit = rnorm(1))
# シミュレーション結果
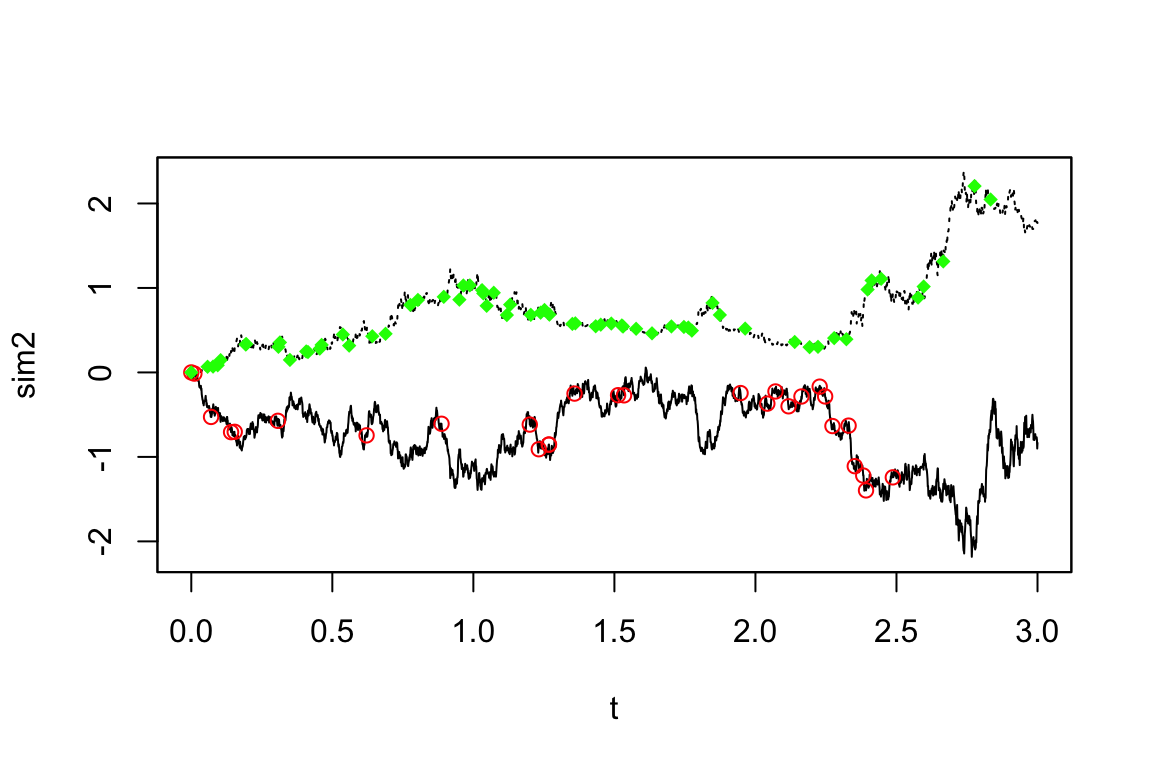
plot(simulation)
さて,このシミュレーション結果から,adaStan() 関数でパラメータが復元できるかを確認しましょう.
rstan_options(auto_write = TRUE)
options(mc.cores = parallel::detectCores())
fit <- adaStan(simulation)print(fit)Inference for Stan model: anon_model.
4 chains, each with iter=1000; warmup=500; thin=1;
post-warmup draws per chain=500, total post-warmup draws=2000.
mean se_mean sd 2.5% 25% 50% 75% 97.5% n_eff Rhat
theta 0.63 0.26 0.78 -0.30 0.01 0.30 1.11 2.47 9 1.22
mu 0.55 0.45 6.96 -11.26 -0.30 0.22 0.67 19.25 241 1.01
sigma 0.52 0.00 0.01 0.50 0.51 0.52 0.53 0.54 595 1.01
lp__ 3059.51 0.28 1.30 3056.61 3058.78 3059.52 3060.53 3061.47 21 1.10
Samples were drawn using NUTS(diag_e) at Fri Mar 28 15:08:12 2025.
For each parameter, n_eff is a crude measure of effective sample size,
and Rhat is the potential scale reduction factor on split chains (at
convergence, Rhat=1).plot(fit)ci_level: 0.8 (80% intervals)outer_level: 0.95 (95% intervals)
library("bayesplot")
library("rstanarm")
library("ggplot2")

posterior <- as.matrix(fit)
plot_title <- ggtitle("Posterior distributions",
"with medians and 80% intervals")mcmc_areas(posterior,
pars = c("theta", "mu", "sigma"),
prob = 0.8) + plot_title
\(\sigma\) の推定はよくできているが \(\mu\) の精度はあまりよくなく,\(\theta\) はバイアスがある様で,自信を持って間違えることも多い.
4.2 brms パッケージ
brms や rethinking も,背後で Stan を利用している.これらが文字式をどのように取り扱っているかを調査する.
Stan コードを扱っている関数は .stancode() であった.
最終的に,.compile_model_rstan() と .fit_model_rstan() が呼ばれるようになっている.
最終的にはこれらの関数も,第 3.2 節で用意した我々の実装と同様の要領で gsub と paste0 を使って Stan コードを生成していた.
4.3 cmdstanr パッケージ
cmdstanr パッケージは 2020 年に beta 版がリリースされた,大変新しいパッケージである.
R6 クラスを用いた現代的な実装がなされている.
4.4 RStanArm パッケージ
詳しくは次稿参照:
RStan と RStanArm パッケージでは極めて洗練された方法を持つ.
stanmodels.R というファイルにおいて,大変洗練された方法で,複数の Stan コードのファイルをコンパイルして,C++ コードへのポインタを格納した stanmodel オブジェクトを生成している.
Stan コードは src/stan_files/ ディレクトリに,bernoulli.stan や count.stan など,8つ保存されている.
まず各ファイルに対して rstan::stanc() を呼び出して,Stan コードを C++ コードへのポインタに変換している.この際 allow_undefined = TRUE という引数があり,未定義の変数が存在してもエラーは出されず,すぐには実行されない.
このファイルでの出力は stanmodel オブジェクトのコンストラクタに渡される.stanmodels は stanmodel オブジェクトのリストである.stanmodel オブジェクトは mk_cppmodule() のスロットを持ち,ここから RCpp モジュールが呼び出せる.
このオブジェクトを通じて,stan_glm.fit.R で,stanmodel クラスのオブジェクト stanfit (stanmodels の適切な要素を用いる)に対して rstan::sampling() 関数を呼ぶことで推論が実行される.
if (algorithm == "sampling") {
      sampling_args <- set_sampling_args(
        object = stanfit,
        prior = prior,
        user_dots = list(...),
        user_adapt_delta = adapt_delta,
        data = standata,
        pars = pars,
        show_messages = FALSE)
      stanfit <- do.call(rstan::sampling, sampling_args)
    }
この際の set_sampling_args 関数によって実行されている引数設定が肝心である
5 テンプレート操作
5.1 glue パッケージ
install.packages("glue")glue (CRAN, Docs)パッケージは文字列リテラルを扱うパッケージである.
library(glue)
name <- "  Hirofumi\n  Shiba\n"
major <- "Mathematics"
glue::glue('My name is {name}. I study {major}. Nice to meet you!')  # 名前空間の衝突を避けるために :: を使う
My name is Hirofumi
Shiba
. I study Mathematics. Nice to meet you!glue::glue(" real {param};", param = yuima@model@parameter@all, .collapse = "\n") real theta;
real mu;
real sigma;これを用いると,adaStan() は次のように可読性が高い形で書き直すことができる:
yuima_to_stan_glued <- function(yuima) {
# パラメータの定義部分を作成
parameters <- glue::glue("real {param};", param = yuima@model@parameter@all)
parameters <- paste(parameters, collapse = "\n ")
# drift と diffusion の式内の 'x' を 'x[n-1]' に置換
drift <- gsub("x", "x[n-1]", yuima@model@drift)
diffusion <- gsub("x", "x[n-1]", yuima@model@diffusion[[1]])
# Stanコード全体を作成
template <-
'data {{
int N;
array[N+1] real x;
real T;
real h;
}}
parameters {{
{parameters}
}}
model {{
x[1] ~ normal(0, 1);
for(n in 2:(N+1)) {{
x[n] ~ normal(x[n-1] + h * {drift}, sqrt(h) * {diffusion});
}}
}}'
excode <- glue::glue(template, .trim = FALSE) # parameters が複数行に渡る場合でも分離して出力しない
return(excode)
}yuima_to_stan_glued(yuima)data {
int N;
array[N+1] real x;
real T;
real h;
}
parameters {
 real theta;
 real mu;
 real sigma;
}
model {
x[1] ~ normal(0, 1);
for(n in 2:(N+1)) {
x[n] ~ normal(x[n-1] + h * (theta * (mu - x[n-1])), sqrt(h) * (sigma));
}
}5.2 whisker パッケージ
install.packages("whisker")whisker パッケージ(CRAN, GitHub)は Web を中心に採用されているテンプレートシステム Mustache に基づく機能 whisker.render() を提供している.
whisker.render(template, data = parent.frame(), partials = list(),
debug = FALSE, strict = TRUE)library(whisker)
template <-
'Hello {{name}}
You have just won ${{value}}!
{{#in_ca}}
Well, ${{taxed_value}}, after taxes.
{{/in_ca}}'
data <- list(name = "Hirofumi"
, value = 10000
, taxed_value = 10000 - (10000 * 0.4)
, in_ca = TRUE
)
whisker.render(template, data)[1] "Hello Hirofumi\nYou have just won $10000!\nWell, $6000, after taxes.\n"Mustache の記法は Manual を参照.
6 終わりに
References
Footnotes
(Wickham, 2019) 第17章2節.↩︎
(Wickham, 2019) 第17章2節.↩︎


